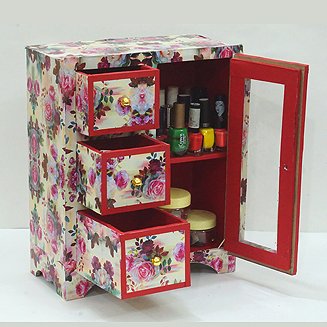
Watch how to make Multipurpose DIY Jewellery Organizer
Are your jewelry and other important things messed out in your cupboard or on the dressing table? Why not give it an organized look by making this wonderful cupboard organizer?
So, let’s learn how to make a cupboard organizer using cardboard.
Things you would require to make cardboard organizer
- Cardboard
- Color sheet
- Printed Sheet
- Transparent paper sheet
- Some beads
- Metal wire
- Divider
- Cutter
- Cello tape
- Pencil
- Scale
- Glue gun
Procedure
Step 1: Take a cardboard and mark measurements of 4.5×12 inches on it. Cut 4 such cardboard pieces.
Step 2: Now take another cardboard and mark measurements 10×12 inches on it. Cut 2 such cardboard pieces.
Step 3: Take the 2 of the rectangular cardboard pieces and mark an inch line on one of the edges followed with another half inch line below it.
Step 4: Now leaving the space of around an inch on both the sides above the lines, make a curvy arc design and cut it using a cutter.
Step 5: Take the 2 big cardboards and make similar curvy arc designs one of them too leaving an inch on both sides.
Step 6: Take the other big cardboard and mark a centre line on it.
Step 7: Divide one side of the cardboard into three equal parts to form a drawer.
Step 8: Make inner lines for all the squares of equal sizes and the other side of the same cardboard.
Step 9: Cut off the squares and the rectangular of the inner lines.
Step 10: Take the other long cardboard and the 3 rectangular cardboard pieces, one with the arced design while the other 2 simples.
Step 11: Using the glue gun, attach the arced cardboard to the side of the big cardboard, while the plain rectangular cardboard on the upper side and lower side.
Step 12: Now take the three 4×4 inch square pieces and place them at equal lengths on the marked side of the cardboard.
Step 13: Now take a sheet and measure the length and width of the squares placed in the cardboard to make small drawers.
Step 14: Make out three such drawers by fixing four cardboards for each drawer.
Step 15: Now take the other big cardboard with boxes and cupboard cut off from it.
Step 16: And fix it on the cardboard forming a box-like a look.
Step 17: Take the colorful sheet and cover each and every corner of the cupboard from inside including the drawers too.
Step 18: For the outer side look, take printed color paper and cover the drawers and the cupboard using it.
Step 19: On the open side of the cupboard, place a transparent sheet for a proper view and fix it using cello tape. And frame the door with another cardboard finished with printed paper.
Step 20: Finally, stick the long cardboard on the cupboard and make sure all the drawers and doors are working well.
Step 21: Make some lace using the colorful sheet and place it on the borders of the drawers and cupboard using glue.
Step 22: Take the beads and the metal wire and fix them on the drawer to make handles with the help of divider.
Isn’t this a wonderful cupboard to use? Try making one and share your experience with us.
Happy Crafting!
Article Tags: Best Out Of Waste Craft · Cardboard Bangle Stand · Cardboard Craft ideas · Cupboard · DIY Jewellery Box · Handmade Jewellery Box · jewellery holder