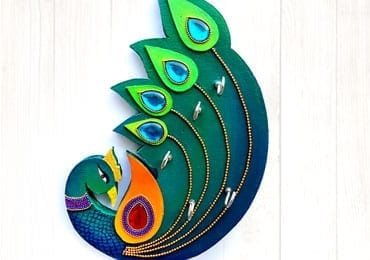
The DIY wall decorations have been trending these days and why not? These DIY décor arts are easy to make, economic and can also help you build your creative skills. If you love to make DIY crafts and turn your home into a colourful crafted paradise, here is another beautiful and stylish recycled wall hanging DIY key holder you must try!

This is a colourful, pearl studded artistic peacock wall hanging to beautify you house! You can easily make this with the decorative stones and pearls along with chart papers and colours!
Things You Will Need To Make The Peacock Shaped Key Holder

- Glue gun
- Cutter
- Pencil
- Ruler
- Colours and brush set
- Styrofoam / thermocol sheet
- Mount board
- Hanging clip
- Key hooks
- Decorative beads and stones
- Glue
Steps To Make The Beautiful DIY Key Holder
Step 1– Draw the peacock

Let’s start with the peacock. For making a peacock, we will need the mount board and pencil. Take any picture of peacock and draw a peacock on the mount board. Choose a bigger mount board to make a large sized wall hanging. Draw the feathers, body and outline the peacock for perfect cutting.
Step 2- Cut the mount board in peacock shape

Once you have drawn and outlined the peacock, it’s time to cut the mount board as per the shape of peacock. With the help of a cutter, carve the peacock out from the mount board. Cut outlines and not the inner designs of the peacock.
Step 3- Make another same sized peacock

We will make the front as well back of the key holder and thus, we need to make 2 layers of mount board. For this, take another mount board and cut in the same size of the previous peacock. Trace the peacock with pencil and with the cutter, make the second peacock. Do not draw the inner designs as this cardboard will be used in the back of the holder.
Step 4- Make the peacock with thermocol sheet

Paste the cardboard with peacock design on the thermocol sheet. Use glue to stick the cardboard thoroughly. With the help of cutter, cut the thermocol sheet in the same way you trimmed the cardboard. Maintain the shape and finishing. Also, stick the second cardboard in the back of the thermocol sheet using glue. Let the thermocol and cardboards stick perfectly and get dry.
Step 5- Prepare the designs

Once the shape of the peacock is done, we will make the feathers and other designs on the peacock’s body. Take another cardboard and draw the drop shaped feathers and designs with a pencil. Draw different sized designs for beautiful pattern and look. Now, with the help of cutter, cut all the designs separately.
Step 6- Colour the designs

Once you are done with cutting the designs, get the colours and brushes and colour the designs. Place the design on a waster cardboard and then colour it to prevent stains on floor. Use different shades for each design for a beautiful and unique look. You can also double shade the designs for a fancy look.
Step 7- Colour the key holder peacock

You also need to colour the key holder peacock now with the help of colours and brushes. Colour the entire peacock with green colour or the shade of your choice. Apply 2 base coats to make the thermocol look shiny and smooth. Now apply shading techniques on the peacock. You can blend standard shades like violet, green, purple, blue, yellow etc to give a shaded look to the peacock.
Step 8- Paint the inner designs of key holder

Once the base coat and shading is done, you need to target the small designs. Paint the eyes, small designs with different shades. Use black and white for eyes, yellow for beak and different shades for different designs.
Step 9- Decorate the key holders with designs and glitzy beads

As the colour gets dried, it’s now time to decorate the peacock with the designs we have made and the glorious beads. Take the designs and stick some colourful stones on them with glue. The drop shaped stones, look ideally perfect for these designs. You can also use small bead chains or threads to frame these stones which will add more beauty to the design. Paste the designs on the key holder with the help of glue.
Step 10- Decorate the key holder with golden beads

The decorative golden beads will make the peacock look more attractive and colourful. Use the golden bead chain to frame the designs. Stick these chains with the help of a glue gun. These chains will look like separate feathers on the body of the peacock. Attach all the designs with the neck of the peacock with the golden bead chain and you will get a beautiful layer of designs.
You can also paint the neck of peacock with some beautiful colours in a wavy pattern to make it more beautiful.
Step 11- Fix the key hooks in the holder and hand the holder

Place each key hook in the partition of the designs. Place the hooks in between the golden bead chains. Fix the hooks horizontally so that you can place the peacock with the feathers in upward direction. Get the hanging clips and paste the clips on the back of the peacock with glue. Stick the key holder on the wall!
Here is your beautiful and classy key holder ready in 11 easy steps!
This is a very simple and easy wall hanging which you can prepare in minutes and decorate your home! You can also use it as a wall hanging or a beautiful key holder to locate your keys on time!
Try your hands on such interesting and innovative DIY arts and let your home shine with the beautiful decorations!
Want to try it with some new shades and designs? Show it to us by pasting the pictures!
Article Tags: Cardboard Craft ideas · DIY Arts · DIY Key Holder · DIY Wall Decorations · Key Holder · Peacock Crafts · Peacock Shaped Key Holder · Recycled Wall Hanging · wall decor · Wall hanging ideas
