Watch how to make this Home Decoration Display Craft
Are you fond of different attractive art pieces that help in decorating your house walls or showcases? Whether it is a small idol piece or a big craft idea, they always add to the beauty of your decorations. Are you also thinking to spend behind such display art pieces? Why not try making one such on your own with waste cardboards!
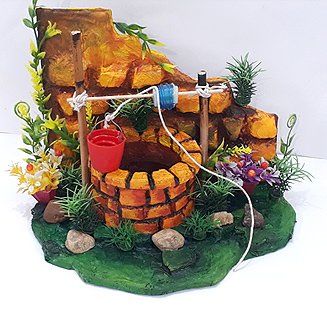
Today, let’s make a well side display piece from cardboards and thermocol or Styrofoam to give your room an attractive look.
Things you would require to make this Display Decoration Craft
- Thermocol
- Waste cardboard cartoons
- Artificial flowers, bushes, and plants
- Cutter and scissors
- Tissue papers
- Pencil and scale
- Divider
- Glue gun
- Empty plastic bottle
- Paint colors and painting brush
- Plastic toy bucket
- Rope and some stones
- Wooden sticks
Procedure
To make this wonderful well side artificial art piece carry out the steps below:
Step 1: First of all, take cardboard and draw the base of the well piece in curvy like the design. Cut it out using a cutter.
Step 2: Similarly, cut out another cardboard piece for forming the back-side wall in a slanting design.
Step 3: Take two cylindrical cardboards, leftover cardboards in a cylindrical shape from empty cello tapes.
Step 4: Place one of the cylindrical cardboards on the base cardboard and take the measurement on the background cardboard.
Step 5: Take some thermocol/styrofoam and cut it in the form of the cylindrical cardboard. Stick it on the base cardboard using a glue gun.
Step 6: On the cylindrical cardboard, stick the other cello tape cylindrical cardboard using a glue gun.
Step 7: Take some thermocol and cut out in tiny odd pieces. Stick thermocol surrounding the cylindrical cardboard forming the well.
Step 8: Similarly, stick some tiny thermocol pieces on the background to give it a look of a wall.
Step 9: Again, cut a cylindrically shaped thermocol and cut an inner circular shape for the top side of the well. On the top side make small gaps at a distance to give it a brick like well design. Stick it on the well to complete the shape of well.
Step 10: Take the glue gun and place it in proper quantity of the gaps between the thermocol pieces.
Step 11: Mix some water and glue properly and apply on the gaps between the thermocol pieces on the background cardboard.
Step 12: Place the tissue paper on the background cardboard and using the paintbrush with glue stick it on the cardboard.
Step 13: Now take the cardboard with the well and similarly stick tissue paper on the well and the floor properly.
Step 14: Take painting colors and brush and color the background wall. You can use colors like yellow, brown, white and green to give it the best look.
Step 15: Now keep the background piece aside to dry and take the other cardboard piece and similarly color it as well using yellow and brown colors.
Step 16: Now take two wooden sticks and stick them on the sides of the well and sticking the third stick on the well joining the two side sticks.
Step 17: Take an empty plastic bottle and cut out the opening of the bottle. Enter it inside the third stick on the well before sticking it.
Step 18: Take a thread and tie on the ends of the stick both the sides.
Step 19: Take the small toy plastic bucket and tie a thread on the handle while the other end is revolved on the plastic bottle end.
Step 20: When the well is ready, attach the background cardboard with the base cardboard properly.
Step 21: Take the artificial plants, bushes, and flowers and finally stick them around the well.
So, here is the best artificial home décor piece for decorating your room or showcases. Hope you loved it and will try making it for your home. If you really do then please share your experience with us in the comments section.
All the best and Happy Crafting!
Article Tags: Best Out Of Waste Craft · Cardboard Craft · Cardboard Craft ideas · DIY Home Decor · Home Decor Ideas · Home decoration craft · Room Decor Display Craft · Thermocol Craft


I loved this tutorial very much…