Photo frames are the best décor elements which remind us of our favorite moments or people. Surrounded by photographs and pictures of our beloved people, we feel inspired and happy. These pictures can be framed while using some of the fanciest and pretty photo frame. In the market, there are different types of photo frames available but the thing is that the frames are quite costly. If you are looking forward to making a beautiful wall décor by using multiple photo frames, you will have to spend a lot of bucks.
We have an interesting and budget friendly idea to turn your bedroom or living room wall into a beautiful memory wall. With the photo frame DIY craft, you can turn the walls into a beautiful paradise of memories.

Let’s learn to make a beaded, decorative photo frame using some handy items:
Things You Will Need To Prepare A Fancy DIY Cardboard Photo Frame

- Scissors
- Cutter
- Pencil
- Adhesive
- Ruler
- Glue gun
- Colour sheets
- Cardboard
- Pearls
- Decorative lace
- Transparent sheet
- Beads
- Decorative pearl lace
Don’t miss this beautiful and homemade artistic nameplate design which you can try
Steps For Preparing A DIY Photo Frame
Step 1: Mark measurements of Frame

Take the cardboard and using the ruler and pencil, mark measurements. Keep the breadth of the cardboard 10 inch while the length of the cardboard 7.5 inch. In this frame, we will also take 4-inch measurements from all the sides to give a border to the frame. Mark all the lines using pencil and ruler.
Step 2: Prepare the base of inner frame

Cut the inner cardboard using a cutter or scissors. You will get a rectangle shaped photo frame with a small rectangle to place your picture. This is the raw base of the frame ready. We now need to prepare the inner frame of the photo frame where we can easily fix the picture. For this, take another cardboard and draw 3 stripes of 1-inch width and 3 other stripes with the width of 0.5 inches. Stick 1 0.5 inch strip of the 1-inch stripe and stick it to the cardboard. Slice down the remaining strip using a cutter. Cut it slant to give a perfect shape.
Try this interesting Match Box Wall Décor to brighten up the living room.
Step 3: Prepare all the sides of inner frame
Again stick a 0.5-inch strip on a 1-inch stripe and stick it to the other side of the cardboard. Slice down the extra portion and give it a slanting shape with the cutter. Similarly, perform this for all the 3 sides of the frame. With this, you will get a perfect inner framing for your frame where you can insert the picture. The top side will be open from where you can insert the picture easily.
Step 4: Cover the frame with color sheet

Once the back side of the frame is done, it’s now time to decorate the front side. For this, take a color sheet (we have chosen red) and take the measurements of the frame and keep an extra 0.5-inch space to prepare a fold. Cut the color sheet using a cutter and press the cutter on 0.5 extra spaces to bend it flexible. Cut the sides to fold the paper and also trim out the internal space for the picture.
Want to create designs for elegant Quilling home decor? Read more decoration ideas with Duck Quilling Pattern…
Step 5: Stick the color sheet to frame
Now, place the cardboard photo frame on the ready color. Apply glue on the entire cardboard frame and spread it evenly. Stick the color sheet frame n the cardboard and fold the 0.5-inch extra sheet in the inner side of the frame and stick it using glue. This way, you will get a perfectly finished inner and outer border of the photo frame. Use the scale and glue to bend the folding and stick it thoroughly to the frame. Insert a picture sized cardboard or color sheet inside the frame.
Step 6: Prepare the frame holder

If you want to place this frame on tables, prepare a holder for this frame or you can hang it on the wall. For preparing the holder, take a cardboard sheet and cut it. Keep it a little narrow from the top and broad from the bottom. Keep the size of the cardboard after comparing it with the top of the frame. Stick this holder with the back of the removable sheet using color sheet pieces. Cut 2 small color sheet pieces and apply glue to both the pieces. Stick half piece on the back of the removable piece and a half on the holder. You can easily fold the holder with this trick.
Here is beautiful and stylish recycled wall hanging DIY key holder you must try!
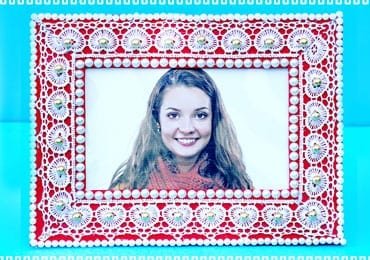
Step 7: Decorate the frame

It’s now time to decorate the frame. Decorate the inner border of the rectangle using pearls. Stick the pearls with glue and cover the entire rectangle. Take a beautiful white lace border and stick it on the broad 4-inch border on all the sides. Apply glue to the border and stick it. At the sides, trim the border slant to make it look perfect. Apply glue using the glue gun and stick the lace on all 4 sides. To frame the outer border of the rectangle, get a pearl chain and stick it to all the 4 sides using glue. Neatly stick the lace using glue and give a perfect finishing touch t the frame.
To make the frame more decorative and unique, keep sticking some golden beads on the lace border according to the pattern of the border. Insert your picture and then insert the removable sheet with the holder and place it wherever you want!
Click here to try your hands on innovative DIY arts and let your home shine with the beautiful decorations!
With this, your beautiful beaded and decorative photo frame is ready! Place this amazing frame in your bedroom or living room tables or stick the frame on the walls to give a refreshing and pretty look to your home!
Share your creative DIY photo frame ideas with us and any suggestions you have. With this interesting and modern photo frame, you can make your home look appealing.
Cherish your memories with this extraordinary and budget-friendly photo frame!
Happy crafting!
Article Tags: Cardboard Craft ideas · DIY Cardboard Photo Frame · DIY Photo Frame · DIY Wall Decor · Recycled Craft Ideas