What’s the most frequent thing we throw in the garbage every week? Cereal boxes for sure. Every time a cereal box gets emptied we throw it though we can prepare something awesome from it. There are plenty of DIY craft options we can try for cereal boxes and can prepare something useful out of them. Today, we are presenting an interesting and easy DIY cereal box craft which you can prepare within 10 minutes.
So gear up to make something awesome and refreshing from your reusable cereal boxes.

Things You Need To Grab For Preparing A Cool DIY Craft From Cereal Box

- Packing tape
- Scissor
- Adhesive
- Pencil
- Pen
- Cutter
- Glue gun
- Ruler
- Decorative pearls
- Velcro
- Cardboard box
- Printed sheets
- Colour sheets
Don’t miss to read recycled craft ideas for beginners…
Steps You Need To Follow To Make A DIY Cereal Box Craft
Step 1-

Let’s start with the cereal box. Take the cereal box and open the bottom of the box using a cutter. Also, open one side of the cereal box and this way, the entire cereal box will open up. Using the cutter cut the 2 squares from the side and the extra portion. Take a cardboard sheet and take measurements of 2 inches and cut a 2-inch long strip. Stick this 2-inch strip to the cereal box on one side using packing tape.
Step 2-

With this extra layer, you will be able to close the box properly. To prepare the inner cover of the box, apply glue on all the sides of the open box and in the center. Spread the glue using a piece of cardboard and stick a color sheet in the open box. Using a tissue paper, stick the color sheet to the box and let it get dry. Cut the extra color paper using a cutter or scissors.
Wondering how to make a stylish handmade purse using cardboard? Read more…
Step 3-

Once the inner covering is done, we will prepare the outer layer for the cereal box. Take a dark pink color paper and apply glue to the entire paper. Stick the paper on the other side of the cereal box and stick the paper thoroughly. Cut the extra color sheet using a cutter and remove it. Keep the pink paper 0.5 inches broader than the actual size to frame the cereal box perfectly. This way, you will get an open cereal box with one side covered with light pink paper and other side covered with dark pink paper.
Step 4-

To make the box more decorative, use a printed paper sheet. Stick this printed sheet on the front side of the cereal box and similarly, use another printed sheet to cover the back of the box. Now, it’s time to seal and fold the entire box. Thus, apply glue on the upper and lower bends of the box and fold the box. Let the glue stick properly while you press the box. Give a proper finishing touch to the box by folding all the small extra portions.
Explore how to make DIY clutch bag handmade gift!
Step 5-

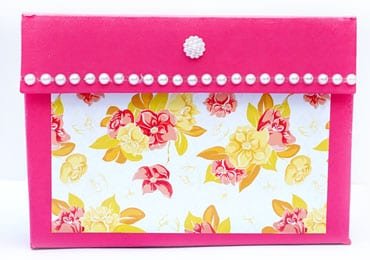
We are making a horizontal bag and thus, keep the lengthy side open. Seal other three sides using glue. With this, the entire box will get sealed properly. For flexible opening and closing, we will stick a Velcro in the box. Open the Velcro and stick it to the bottom and inner top of the box. It’s now time to make the box look decorative. Thus, get a pearl lace and stick it on the top of the box. Apply glue and stick the pearl lace. You can also stick pearls or beads using glue. Stick a decorative stone or pearl on the top of the box for a buckled feel.
Let us learn how to make this DIY Cute Handmade Mini Paper Bag.

With this, your cool DIY cereal box craft is ready!
You can use this amazing box to store many items like your books, magazines, important documents, letters etc. this box will help you store all your important documents and stuff easily in one place. You can prepare such multiple boxes and pile them up in your drawer to keep the documents safe.
Did you try making this DIY Cereal Box Craft? Do not forget to share your experience with us! Also, your valuable suggestions are welcomed.
Happy crafting!
Article Tags: Best Out Of Waste Craft · Cardboard Organizer · DIY Cereal Box Craft · Recycled Wall Hanging · Reuse Cereal Box Craft


