Our home décor is the reflection of our choices and creativity. The best way to showcase your rich crafting talent is to prepare some amazing DIY crafts and décor your home using it. A beautiful DIY nameplate in the front of the door can simply charm people as it is the first thing visible to the guests.

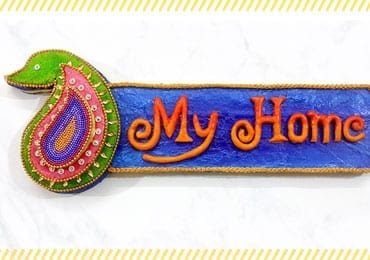
Here is a beautiful and homemade artistic nameplate design which you can try with some simple steps! Decorate your home sweet home with this masterpiece today!
Things You Will Need To Make A DIY Nameplate

- Cardboard
- Adhesive
- Glue gun
- Thermocol sheet
- Decorative stones
- Glittery laces
- Bead chains
- Pencil
- Ruler
- Cutter
- Tissue papers
- Hooks
- Cotton bandage
- Colours and brushes
- Scissor
- Transparent sheets
- Shilpkar clay
Steps To Make A DIY Nameplate
Step 1- Design the cardboard

Let’s start with cutting and trimming the cardboard. Open the cardboard while tearing the folds. Open the cardboards and cut a rectangular shape from the cardboard. You can use shoe boxes, cardboard sheets or such thick cardboard papers.
Once you cut the rectangular cardboard, draw a design on the board. You can choose any of the ethnic, floral, peacock design which looks fabulous. Here we are using a beautiful peacock style design. Make the design and draw two lines on the top and in the bottom which will be used to display the name. Cut the entire design with the help of a cutter.
Step 2- Make the nameplate with thermocol sheet

The name plate must be thick and embossed. For this purpose, we will use the thermocol sheets. Get a piece of thermocol sheet and draw the same design of the nameplate on the thermocol sheet. You can use the transparent paper or can manually draw the design. Now, with the help of cutter, cut the thermocol sheet design.
Make 2-3 same design in small sizes on the thermocol and cut it with a cutter.
Step 3- Attach the thermocol sheet and design
Now it’s time to attach the thermocol sheet with the design to give it an embossed and thick texture. Stick the designed cardboard on the thermocol sheet using glue. Press the design and let it stick properly.
Once the design gets dry, cut the thermocol sheet framed with the design with a cutter. Maintain the shape of the design and trim out the unnecessary edges. You can also use ruler to get perfect measurements and cut.
Step 4- Make the second side of the design

On one side of the thermocol sheet you have already pasted the design. Now it’s time to paste the design on second side. For this, place the thermocol design on a cardboard paper, trace the design and cut the design with the help of cutter.
Take some glue, apply it on the cardboard design and paste it in the back of the thermocol sheet. Now we have a design pasted on both the sides of the thermocol.
Step 5- Design the shapes

We need to give a beautiful look to the designs we shaped. Also thermocol will not absorb the colour properly and this is why, we will use cotton bandages. In a bowl, pour some glue and with a brush, apply it on the designs. Stick the cotton bandages on the designs. Trim the edges and give a perfect finishing to the design. Apply the cotton bandages on all the designs.
Now, colour the design. Apply colour on the cotton bandage which will thoroughly absorb the colour. Paint all the designs with different and complementing shades and let the designs get dry.
Step 6- Colour and design the nameplate

Get a tissue paper and paste it on the nameplate. With the help of a brush, apply glue and stick the layers of tissue paper on it. Enhance this layer to give it a thick look. When the glue dries off, apply paint to the nameplate. Colour the entire object with paints and you can apply double coats to get a smooth and fine look.
While the colour on the nameplate gets dry, stick up the designs. Keep the largest design first and then stack up the other designs on the basis of size. Use glue gun to paste the designs.
Step 7- Decorate the nameplate and design

Now it’s time to use the golden lace to cover the sides of the design. Apply some glue on the sides and stick the golden lace on the sides of all the designs. This will give a glittery and perfect finish to the designs and colours. Also stick this golden lace on the side of nameplate.
Use the decorative beads and stones to make the design and nameplate more attractive. On the edges of the top most design, apply some glue and stick the stone chain. In the middle of the design, stick drop shaped stones while frame the design with beads chains. Frame all the designs from top to bottom with golden beads which will give the design a perfect finish and embossed glitter look! Stick the glitzy stones in the gaps which will get highlighted and shine.
Step 8- Paste the design on nameplate and decorate the nameplate

Once we get the design completely ready with laces, stones and colours, paste it on the nameplate. Stick it using glue and let it dry. Now it’s time to get the name on the nameplate. For this, get a cardboard printed with ‘my home’ or any name you want. Get some clay and soften is with your hands. Roll this clay to make letters and apply this rolled clay on the cardboard.
Stick all the clay letters exactly on the cardboard and give it an interesting look. Now colour these letters which you prepared with clay. You can choose different shades and also use 2-3 colours to give it a natural impact!
Step 9- Complete the design with added decorations
When the colour gets dry, with the help of cutter, remove the letters one by one. This way, you will get hard and painted letters which you can stick on the nameplate easily. Now, you simply need to paste these letters on the nameplate.
Use glue gun and stick all the letters on the nameplate. Let it dry for few minutes and your nameplate gets almost ready. For extra decoration, frame the nameplate with bead chain using glue. You can also use golden or copper decorative lace which looks completely stunning! Paste the hooks at the back of the nameplate and its ready to use!

This is a beautiful nameplate design which you can make using handy things like cardboards, thermocol etc. make a worthy use of all these amazing DIY craft materials and make something new and inspiring each day!
Article Tags: DIY Home Decor · DIY Nameplate Décor · DIY Wall Decor · DIY Wall Decorations · Nameplate Design