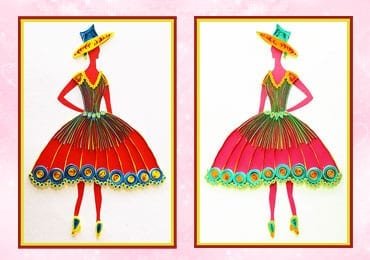
Hey girls! It’s time to take up an exciting DIY Room Decor Project and learn how to make a beautiful Quilling Princess Frame for Room Decoration. Making crafts like easy diy wall art using quilling pattern is one of the most amazing ideas to give your home decorations a personalized and a creative appeal.
Invest your creativity in learning paper quilling art and spend some time in making this quilling wall hanging. Give your living room interiors an absolutely new look with this pretty Quilling Princess Frame for Room Decoration- an ideal Easy DIY Wall Art Idea for girl’s room.

Material Required in Making the Quilling Princess Frame

- Red and White Coloured paper
- Scissors
- Quilling Strips
- Quilling needle
- Cutter
- Adhesive
- Pencil
- Adhesive
Do you want to revamp any boring wall of your living room? Click here to create stunning DIY Wall Decoration using Quilling & Ear Buds…
Procedure to Make Easy DIY Wall Art Using Quilling
Step 1-
Take a stencil and draw the given shape on a red paper.

Step 2-
Take a yellow quilling strip and divide and cut it in 4 equal parts. Make tight coils using them.


How to make DIY Room Decor with Awesome Paper Quilling Art? Don’t miss to read here….
Step 3-
Start to make the dress of the Quilling princess by pasting the tight coils on the upper body of the princess, and start to form the design.

Step 4-
- Divide and cut yellow and blue strips into 4 equal parts.
- Take 1/4th part of each coloured strip and paste them together.

Let us see how to make a vibrant peacock feather using Paper Quilling.
Step 5-
Make dual coloured tear drop shaped coils with them.

Step 6-
Paste these coils at the waistline of the princess’ dress.

Step 7-
Cut and paste quilling strips vertically according to the different size, in the upper body portion of the princess.

Want to create masterpiece from the best out of waste craft? See here – Plastic Spoons & Mirror Wall Decor!
Step 8-
- Cut out the shape of the princess from the red colour paper with a cutter.
- Paste the cut out of the princess on a thick white paper.

Step 9-
Begin to make the skirt of the princess by pasting the quilling strips vertically.

If you wish to know how to make Recycled Craft, please click here for amazing Home decoration Idea…
Step 10-
- Take ½ of a yellow strip and paste and join the blue strip with it. Make loose coils.
- Paste these coils in the hemline of the dress.
- Divide and cut a yellow strip in 4 parts and a blue strip into 8 equal parts. Paste and join the strips here.
- Make tight coils and paste them under the loose coils.

Step 11-
Cut and divide yellow and blue quilling strips in 8 pieces and paste them vertically to add design to the skirt.

Step 12-
Take yellow and blue strips and make a loose coil. Paste it to make the hat.

Have you ever thought, that the broom can be used as a decorating item? Click here create a wonder piece for your home decor out of it…
Step 13-
- Paste and join a yellow strip and half of a blue strip and make coils.
- Shape the coils to make the princess’ shoes.
- Paste and cut out small strips to make the sleeves of the princess.
- Finally, paste yellow and red strips to give a frame to the princess.

And if you thought that making easy diy wall art using quilling techniques would take time then this amazing Quilling princess Wall Decor will prove you wrong. Such a regal looking Quilling Princess makes for an enjoyable and fun art and craft activity for your kids. Wall hanging frames give the home a very appealing look, without much ado.
Let us have a look at how to make the amazing Quilling Princess Wall Decor Frame.
So get your crafters hat on, explore DIY Room Decor Ideas and make yourself a cool craft like this Quilling Princess Wall Decor.
Article Tags: Decoration Ideas · DIY Paper Crafts · DIY Room Decor · how to's · Kids Crafts · Quilling Princess · Wall Art · Wall Frames

Such a pretty artwork 😀 Beautifully done.