Watch this Beautiful Plastic Bottle Craft Idea of Making Jewelry Holder
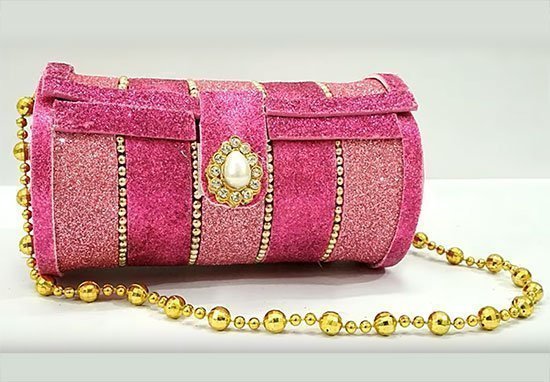
Jewelry organizers are a must for every woman as it can be used to arrange and store things. Moreover, the ease of access can save you lot of time. Keeping this fact in mind, here we are going to make a beautiful jewelry organizer and that too from plastic bottle. This organizer is a utility item and also acts as a home décor.
Making this craft is an excellent idea to help save environment since we are using plastic to make this handmade craft. This way the waste plastic bottle that was about to go and harm our environment is being converted to more useful and creative utility. You will surely love to make this recycled craft at home for yourself.
Things Needed
- An Empty Plastic Bottle
- Cardboard
- Color Paper
- Printed Paper
- Glitter Sheets
- Styrofoam/Thermocol Sheet
- Craft Wire
- Cutter
- Scissors
- Marker
- Adhesive
- Fevibond Glue
- Cello Tape
- Glue Gun
- Rubber Band
- Beads
- Artificial Flowers
Procedure
Step 1: Let’s take a plastic bottle and cut the upper and lower portion of it. We need only the middle portion of the bottle for the craft. Remove the wrapper as well.

Step 2: Now draw markings on the bottle and cut it into two equal halves. Take a cardboard and draw circles similar to the base of the bottle. Cut it. We need four circles for the craft.

Step 3: Measure and draw some markings on two circles. Cut it accordingly. This will act as the divider in the organizer.

Step 4: Take color paper and cover the circles with it. Make small cuttings on the color paper and stick it on the cardboard circles using adhesive.

Step 5: Now stick the circles in the plastic piece to make the organizer.

Step 7:Take printed paper and cover the outer surface of the organizer using fevibond glue.

Step 8: Take the other bottle piece and stick one side of it on the organizer using cello tape. This will act as the flap for the organizer.

Step 9: Cover this flap with the same printed paper to give it a uniform look.

Step 10: Let’s take a piece of Styrofoam/thermocol sheet to make the base of the organizer.

Step 11: Apply glue on the sides of this piece and paste printed paper around it. Now stick the organizer on top of the Styrofoam piece using glue gun.

Step 12: Let’s take glitter paper and cut out multiple long strips from it. Stick these glittery strips on the edges of the organizer for a decorative look.

Step 13: Let’s take rubber band, beads, craft wire and artificial flowers. Insert a bead into the rubber band and tie a knot. Now make a hole on the flap portion of the organizer.

Step 14: Pass the rubber band through this hole and tie a knot on the inner side. Similarly, make another hole on the opposite side. Insert a bead through a craft wire and pass it through the hole.
Step 15: This will serve as the opening/closing point of the organizer. Now stick an artificial flower on the rubber band side to cover the hole.

Wow! Your beautiful jewelry organizer from plastic bottle is now ready.

Conclusion
This jewelry organizer is really useful and looks great as well. You can easily keep jewelries and cosmetics arranged in it. Also, it is compact and portable and you can carry it anywhere with you. You can keep it on your dressing table and can easily access things from it. It is both attractive and useful which makes it really unique.
Hope you will enjoy making this craft. In case of any suggestion or feedback, please share the same in the comment section.
Happy Crafting!
Article Tags: Best Out Of Waste Craft Ideas · DIY Organizer from Plastic Bottle · DIY Plastic Bottle Craft · Jewellery Organiser · Plastic Bottle Craft · Plastic Bottle Craft Idea · Recycled Bottle Craft


