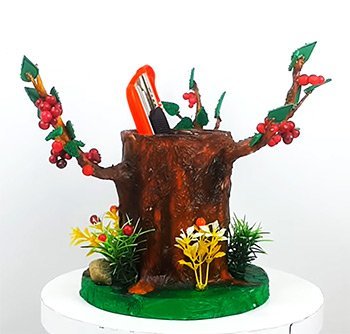
Pen stands or pen holders are much helpful and widely used products. They not only help in keeping the pen, pencils and other stationary things at a particular place but when given a decorative touch, also proves to be an amazing showpiece for the users. Here is one best out of waste craft item that would not only provide you with a beautiful organizer but also a decorative pen holder.
Through this video, today let’s learn how to make a pen holder in the shape of a tree using some unwanted items in your house.
Things You Need
- An empty container
- Cardboard
- Metal wire
- Tissue papers
- Acrylic colors and paintbrush
- Thermocol balls
- Foam sheet
- Artificial flower and plants
- Fevicol and water
- Scissor and cutter
Procedure
So, are you ready to make this wonderful tree shape organizer? Here are the steps to make it –
- Take a tin container and some cardboard in square shape.

- Place the tin in the center and mark a circle using it on the cardboard. With the help of a radius, make another circle bigger than the one with tin measurements.
- Cut the circle on the cardboard using a cutter. Similarly, cut another circle from the other cardboard.

- Apply glue on the cardboard and stick both the circular cardboards to make a thick base.

- Stick the container in the center of the cardboard.

- Now take some metal wires. Cut them medium, and bend them giving them the shape of branches for the tree.

- Stick the metal wires on the container on three different sides.

- Take a bowl and add some Fevicol and water to it. Mix properly using a brush. Take some tissue papers. Tear it into pieces and wrap them on the metal wires using the mixed glue. Apply glue as you stick the tissue pieces on the metal wire for proper fixing.

- After covering the metal wire with the tissues, cover the container with the tissue pieces in the same way. While covering the container, leave some tissue pieces on the cardboard to give it a root-likea look.

- When the tissue paper covering dries completely, take come acrylic colors and a paintbrush. Using brown color, start painting the container, the branches,and the cardboard. Give the brown color some yellow shading for a realistic look.
- Color the cardboard in green color giving the green color some brown strokes with yellow shades. Also, color the edges of the cardboard in green.

- Now take a plastic bowl and add some thermocol balls in the bowl. Add some acrylic colors to the balls and color them with a brush. Remove them on a cardboard piece and allow them to dry as they form bunches.

- Take a foam sheet and draw leaves on it. Cut the leaves using scissors. Stick them randomly on the branches of the tree. Take the thermocol balls in bunches to the tree branches.


- For additional decoration, take some artificial plants and flowers. Stick them on the cardboard surrounding the container. Take some stones and stick them there too.

There you are! Isn’t it a beautiful combination of the decorative art piece and an organizer! The organizer can be used for stationery items, keys, and other desk things that randomly lie here and there on the table. So, how are you making your tree shape organizer? Do share your designs with us.

Article Tags: Decorative Showpiece · DIY Desk Organizer · DIY Tree Shape Organizer · Easy Diy Crafts · How to Make DIY Tree Shape Organizer · Pen Holder · Pen Stand


