We love DIY Origami Paper Projects! Easy to do and totally unique, learn how to make DIY Origami Organizer craft and say hello to systematic storage. Easy and fun craft activity for kids, Origami Art-the ancient paper folding technique that finds its root in Japan has always been every crafter’s first love. This DIY organizer is one of the best kid’s craft ideas for and also works as a very affordable and pocket friendly paper craft idea for beginners.

The DIY Mini Organizer Shelves are such a cool craft and an awesome craft idea for girls too! From stationary supplies to beads and your bracelet charms to pins and sequins, all those little embellishments and supplies that you always searched for can now be found in this DIY Mini Organizer shelves.
Material Required to Make the DIY Origami Organizer

- Coloured paper
- Glossy paper
- Double sided tape
- Scale
- Craft glue
- Cutter
- Scissors
- Pencil
- Cardboard
- Decorative Tapes
Let’s Make Cute And Easy Origami DIY Craft For Kids! Read more for details…
Procedure to Make the DIY Organizer Using Origami Art
Step 1-
- Take coloured papers and cut square shaped papers measuring 21 cm x 21 cm in 3 different colors.
- Fold the paper to get diagonal crease.

Step 2-
Follow this by folding 4 small squares inwards from all four corners.

Do you know how to make a simple and easy paper gift box in 5 minutes! Click here for easy tutorial…
Step 3-
Fold the paper further to get square boxes as directed.

Step 4-
Make 3 square paper boxes in the same way.

Step 5-
Take 3 cardboard cut outs each measuring 12 cm x 7 cm.

If you wish to make handmade paper envelope for your special someone, you will love to read here…
Step 6-
- Join the 3 cardboard pieces together using double sided tape.
- Cover the 3 adjoining cardboards with a coloured paper.

Step 7-
Now take a green rectangular paper measuring 10 cm x 21 cm and cover the central space remaining on the cardboard.

Looking for easy to make handmade gift ideas? Click here to get Easy DIY Paper Box craft idea…
Step 8-
- Now cut small squares of glossy paper and paste them in the base of each coloured box.
- Give a designer look to the boxes with decorative tapes.

Step 9-
Paste the 3 coloured boxes on the top middle and bottom corner of the three cardboard flaps, with the help of a double sided tape.

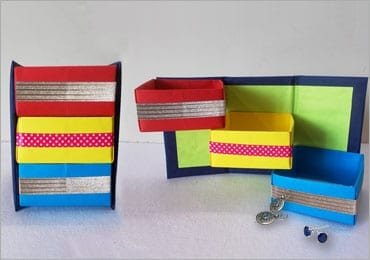
And there your very own DIY Origami Multipurpose Organizer is completely ready. Just look at those vibrant colours and the fantastic and super easy DIY Organizer Origami Craft you made. It is the best paper craft idea that you can do it yourself at home. Use it as a fun art and craft activity for kids and use this DIY Origami Organizer on your kid’s study table.
Let’s have a look at how to make DIY Origami Organizer.
Making Origami crafts is super fun right? Then do send in your creations to us. Share your creations and feedback with us!
Happy crafting!
Article Tags: DIY Origami Crafts · DIY Origami Shelves · Kids Craft · Mini Organizer · Origami Organizer · Paper Craft Ideas