The latest fashion trend that is being considered as the hottest fashion statement is that of Handmade Paper Jewellery. So learn how to make Quilled Beehive Earrings, for pretty and comfortable fashion! Whether it is a casual lunch or a formal occasion like weddings, paper earrings are fast becoming a major fashion statement. Quilling Earrings DIY designs for beginners should be simple to follow and easy to make.

To make quilling earrings there is absolutely no need for anything else except your regular quilling supplies and colourful quilling strips. From simple flower quilling designs to various quilling earring making tutorials for beginners, anyone can get their hands on making Quilling Earrings DIY technique. Paper Quilling Art and Paper jewellery go hand in hand and make for a fun Quilling Earrings DIY Project, for any craft lover.
Looking for some creative and useful craft idea for girls? Let’s watch here how to make an easy DIY Stocking Flower Tiara…
Material Required For Quilling Earrings DIY Project

- Quilling Strips (5 mm) in Pink, Blue, Yellow Colors.
- Quilling Needle
- Adhesive
- Scissors
- Jump rings
- Earring Hooks
Procedure to Make The Quilled Beehive Earrings
Step 1-
Begin making the Beehive Quilling Earring, pasting two blue color strips together and wrapping them around a circular object to make the outer rings.

Step 2-
- Take a yellow and blue quilling strip and divide them in two equal parts.
- Paste one half of the yellow and one half of the blue strips together, to make a closed tight coil.

Step 3-
Arrange and paste these dual colored coils in the ring.

Learn how to make fantastic looking DIY Handmade Jewellery!
Step 4-
Take a pink strip and divide it in half. Make tear drop shaped coils with them.

Step 5-
- Take two blue colored quilling strips and divide each strip in 4 equal parts.
- Paste these strips one on top of the other to make a multilayered piece of strips.
- Give it a slight curve with your fingers.

Step 6-
- Paste the tear drop shaped pink coils outside the ring, on the edges and attach the curved multilayered blue curved ring to it.
- Divide yellow strips into halves.
- Take one half of the strip and used them to make tight coils.

Step 7-
- Divide and cut a pink colored Quilling strip in 16 equal parts.
- Make a loose s-scroll with each piece of the pink strip.
- Arrange and paste them in the earring to form a beehive pattern.

Step 8-
- Cut 1/4th blue colored quilling strip and make a loose closed coil with it.
- Insert a jump ring through the coil and insert an earring hook to complete the earring.


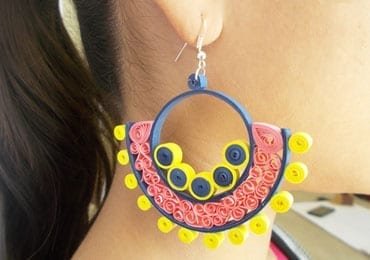
There you have it friends! In just a few steps and with the use of simple techniques of quilling art, your beehive earrings are ready! Paper earrings never looked more beautiful. This amazing and beautiful Quilled Earring in Beehive design is a craft masterpiece. You should definitely give a chance to your creativity and try making pair of pretty Quilled earrings with the help of a Quilling Tutorial!
What are your favourite designs when it comes to making Quilled Earrings!
Article Tags: Beehive Earrings · Crafts · DIY Jewellery · DIY Projects · how to's · Paper Craft · Paper Earrings · Paper jewellery · Quilled Earrings · Quilling Art