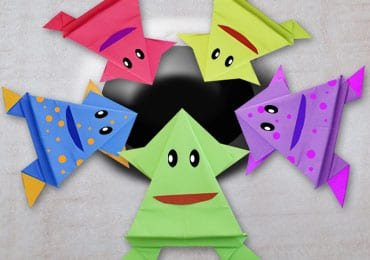
Is your kid’s school project deadline approaching? Fear not for we brings you our very own tutorial on how to make an origami frog. Origami Art is one ancient art of paper folding that is popular even in today’s day and age for its vitality and versatility of colourful models and designs that can be created using this paper folding technique. Origami Frog is one such colorful craft.
If you are looking out to learn how to make an origami frog, you are watching just the right thing! From school projects of your kids to adding a little touch of the homemade and handmade art of Origami, you can use this Origami Art in endless ways to let your imagination play free and wil. It is a great idea of Kids Fun Craft!

Making origami jumping frog is a fun and enjoyable activity for you to indulge in. Well, I bring for you an amazing step by step tutorial on how to make an easy Paper Jumping Frog.
Material Required For Making Origami Frog
- An A4 sized paper
- Black pen
- A red paper
- Scissors
How to Make Kusudama Paper Flowers? Read more for step by step procedure…
Procedure to Make Origami Frog
Step 1-
Taken an A4 size paper and fold it into the half.

Step 2-
Take the paper, the white portion facing you, Take the top right and left-hand side corners and bring them down to the centre of the paper to make a pair of two triangles into making a book fold of the triangles meet the crease.

Step 3-
Flip the paper to the other side and give a quick turn to the triangle to the other side, make a clear crease along the base of the paper.
Click here for tutorial on How to Make an Easy Origami Butterfly…
Step 4-
Now completely unfold the paper and cut out the long strip at the base of the triangle.

Step 5-
Out of the rectangular cut out that you get, take the bottom left corner up to meet the crease and to make a triangle.

Step 6-
Now in your hand you have a rectangular shaped cut-out with two squares with diagonal creases.

Step 7-
Take the corner of the left-hand side and the right-hand side up to the middle of the paper to make two triangles to create the desired crease.
Step 8-
Fold the paper into a book fold giving you two rectangles. This will give you an additional perpendicular crease that is bisecting the diagonals of the square.

Want to learn, How to make an origami fortune teller easily? Click here to learn this easy paper folding technique…
Step 9-
Now flip the paper and pay attention to the centre of each box. Hold the paper from both the sides of the central bisector and lay it flat so as to collect the corners and make a flat triangle out of it.

Step 10-
Repeat the same process on the other square to give you two triangles with an opening on each side.
Step 11-
Fold further as shown to make smaller triangles with multiple openings on all sides.
Step 12-
Further, you should achieve one bigger triangle on one side and two smaller ones on the other.

Don’t miss to read How to Make Beautiful Flower From Paper!
Step 13-
Keep folding these triangles further towards the outer side to give you the hands and feet of the frog.

Step 14-
Lastly, fold the base of the frog in a paper valley pattern twice so as to help the frog bounce and jump off the ground well.


Step 15-
After the frog is ready, take a black pen and draw two oval shaped eyes on the frog’s face.
How to Make Easy Crepe Paper Flowers for Kids? Read more…
Step 16-
Take a red paper and cut out a smile for your frog.

And there goes your frog! Bouncing and jumping happily! Doesn’t it look adorable with that smile? And the way it hops and jumps enlivens the child in you. You can go wild in making designs of your own choice using Origami Art. We are sure you will be getting your hands down on making one of these cute little jumping frogs.
Trying to make your own creation using Origami Art? Show us how your shot was at making the origami frog! We would love to see your work!
Article Tags: Folding Technique · Holiday Craft · how to's · Jumping Frog · Kids Craft · Origami · Paper Craft


