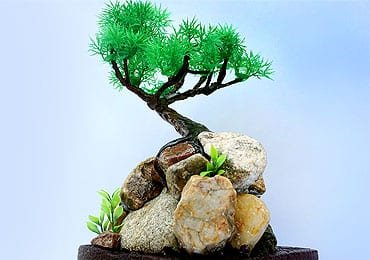
Home décor is one of the most important aspects which also showcase your personality and choices. There are uncountable décor options based on different themes which can brighten up your home interior! The beautiful DIY Artificial Bonsai Tree is one of such beautiful décor items which you can place in your living room while flaunting your DIY skills!

Looking for a fun filled weekend DIY excitement? Here is an artificial clay and paper made bonsai tree to add more glory to your living room décor you must try!
Things You Need To Make A DIY Artificial Bonsai Tree

- Pliers
- Scissors
- Aluminium foil
- Aluminium wire
- News papers
- Thermocol box
- Artificial grass and leaves
- Wood finish oil
- Glitzy natural Stones
- Plaster of Paris
- Colours and brushes
- Glue gun
- Shilpkar clay
Click here to learn 5 Awesome Recycled DIY Crafts!
Steps To Make An Interesting Paper And Clay Tree
Step 1- Prepare the thermocol box

Choose a thermocol box with a huge hole in centre. Slice the thermocol box from the lower end making a sheet similar to bread slice. Keep the thermocol sheet bit thick as the tree has to be made on the same sheet. Now, paste all the natural stones on this sheet with the help of glue.
Arrange the stone in a natural formation where the rocks and stones are arranges on each other. Fill the gaps with glue gun to get a strong grip for the stones.
Step 2- Make the tree stem

Now, we need to make the stem of the tree and for this, we will need a long aluminium wire. Cut this wire it with a cutter into several same sized wires. Prepare such 6-9 inches long wires and tie these aluminium wires while wrapping them with a single aluminium wire. Soften these wires with the help of pliers. Prepare a shape of a bent stem and fix it in the middle of the stones.
Once you fix the wire bunch / stem between the stones, open up the wire ends from the top which will make it look like branches. Open and spread the branches as if these branches are blooming.
Let us have a complete look at how to make the Tissue Paper Dancing Doll!
Step 3- Make the branches

Now take the newspaper and cut it into small strips. The size of these strips is closer to the branches size. In a bowl, get a mixture of water and plaster of Paris. Stir the mixture and make it medium thick. We need to prepare the branches and thus, have to protect the stones from getting affected. For this, cover the stones with a plastic bag.
Now, dab the newspaper strips into the plaster of Paris mixture and start sticking it to the base of the stem. Continue while covering the aluminium wires and branches. Wrap the aluminium wires entirely by the pop sipped newspaper sheets.
Step 4- Make more branches with clay

We need some more branches to make the bonsai tree look fuller and natural. For this, take the clay and soften it. Prepare small and large sub branches for the tree and stick them. Make the branches denser using clay rolls. Also thicken the base of branches.
Give a natural look to the stem of the tree by sticking long roots to the tree. Prepare these long roots by rolling clay and sticking these clay roots on the base of the tree. Cover the stones with these clay roots and give it a perfectly natural look!
Let us learn the super efficient how to make DIY Cardboard Organizer!
Step 5- Colour the tree

For the entire tree a natural feel, it’s now time to colour the branches and stem of the tree. Use the brown paint and paint brush to colour the stem and branches. Apply thick coats to give a denser look. Also cover the long roots over the stone. You can use black and other shades to double shade the tree and make it look beautiful!
Paint the tree as if it is widely spread above the stones and under the stones.
Step 6- Give finishing to the stones

To make the stone look glitzy and shiny as the natural stones, use wooden finish oil. Apply some wood finish oil to the stones and stem with a paint brush. This will give a shiny effect ad natural feel to the complete piece. Thicken the paint beside the stem.
Let us have a look at how to make a utility Basket from Plastic Bottle!
Step 7- Attach the leaves

To complete the tree, get the artificial leaves. Stick the leaves and grass to the branches with the help of glue. Cover each and every branch and make the tree look fuller while using multiple leaves and grass.
To give a perfect forest look, also stick the leaves and grass on the stones, beside the stem and in a random fashion. Fix these leaves in between the stones. The last step is to give a finishing effect to the bonsai tree masterpiece by covering the thermocol base.
Use brown colour to cover the thermocol sheet and apply thicker coats with a brush. This will give a natural woodsy look to the entire art piece. Here is the perfect bonsai tree made from clay and papers ready!
If you have wooden furniture in your home and like a natural atmosphere in your home, prepare this easy and interesting bonsai tree art piece! Place this wonderful tree in your living room and please your guests with your DIY skills!
Article Tags: Artificial Tree · Bonsai Tree Décor · Clay Craft · DIY Artificial Bonsai Tree! · DIY Home Decor · Paper And Clay Tree · Plaster of Paris


